
在武漢肺炎疫情影響下,不少公司計劃安排員工在家工作(Work From Home),可是還需要解決員工在家存取辦公室的電腦文件檔案。在辦公室安裝 Linux 主機,建立虛擬網絡伺服器是一個可取而廉價的方案。
Ubuntu 是一個較方便快捷安裝的 Linux 系統,在安裝 Linux 之後,就可以安裝虛擬網絡相關的package。為簡化 Windows 及 macOS 系統連接方法,所以本文介紹安裝 L2TP/IPSec 的 256 位元虛擬網絡的方法。
在安裝 Ubuntu 18.04 LTS Server Edition 後,用 APT 安裝 strongSwan IPSec VPN 和 Layer 2 Tunneling Protocol 套件。
$ apt-get install strongswan xl2tpd
編輯 /etc/ipsec.conf,加入以下一段,並把 left 設定為外置 IP 網址。
# ipsec.conf – strongSwan IPsec configuration file
conn L2TP-IPSEC
authby=secret
rekey=no
keyingtries=3
type=transport
esp=aes128-sha1
ike=aes128-sha-modp1024
ikelifetime=8h
keylife=1h
left=XXX.XXX.XXX.XXX # your system’s external IP
leftprotoport=17/1701
right=%any
rightprotoport=17/%any
rightsubnet=0.0.0.0/0
auto=add
dpddelay=30
dpdtimeout=120
dpdaction=clear
#force all to be nat’ed. because of iOS
forceencaps=yes
編輯 /etc/ipsec.secrets,加入以下一段,並把 xxx.xxx.xxx.xxx 設定為外置 IP 網址﹐及用 PSK 設定 private key。
# This file holds shared secrets or RSA private keys for authentication.

# RSA private key for this host, authenticating it to any other host
# which knows the public part.
%any xxx.xxx.xxx.xxx : PSK "Your_Pre-shared_Private_key_here"
編輯 /etc/ppp/options.xl2tpd,加入以下一段。
require-mschap-v2
refuse-mschap
ms-dns 8.8.8.8
ms-dns 8.8.4.4
asyncmap 0
auth
crtscts
idle 1800
mtu 1410
mru 1410
connect-delay 5000
lock
hide-password
local
# debug
modem
name l2tpd
proxyarp
lcp-echo-interval 30
lcp-echo-failure 4
編輯 /etc/xl2tpd/xl2tpd.conf,加入以下一段。
[global]
ipsec saref = no
debug tunnel = no
debug avp = no
debug network = no
debug state = no
access control = no
rand source = dev
port = 1701
auth file = /etc/ppp/chap-secrets

[lns default]
ip range = 192.168.2.10-192.168.2.99
local ip = 192.168.2.1
require authentication = yes
name = l2tp
pass peer = yes
ppp debug = no
length bit = yes
refuse pap = yes
refuse chap = yes
pppoptfile = /etc/ppp/options.xl2tpd
編輯 /etc/ppp/chap-secrets,加入以下一段作為 VPN 登入用戶帳號和密碼。
# Secrets for authentication using CHAP
# client server secret IP addresses
testuser * testpassword *
編輯 /etc/sysctl.conf,加入以下一段來啟動 IPv4 的 IP forwarding。
net.ipv4.ip_forward=1
然後重新載入 sysctl.conf 便可。
$ sysctl -p /etc/sysctl.conf
使用 iptables 來做 NAT masquerade 讓 VPN 用戶能連接外部網絡及互聯網。
$ iptables -t nat -A POSTROUTING -s 192.168.2.0/24 -o eth0 -j MASQUERADE
最後重啟 strongSwan IPSec VPN 和 Layer 2 Tunneling Protocol 套件便可。
$ /etc/init.d/ipsec restart
$ /etc/init.d/xl2tpd restart
如果外部網絡有防火牆或 Router,需要在防火牆或 Router 設定 Virtual IP 或 Port Forwarding,讓外部 UDP 500, 1701, 4500 的 request 能進入 Linux 伺服器。
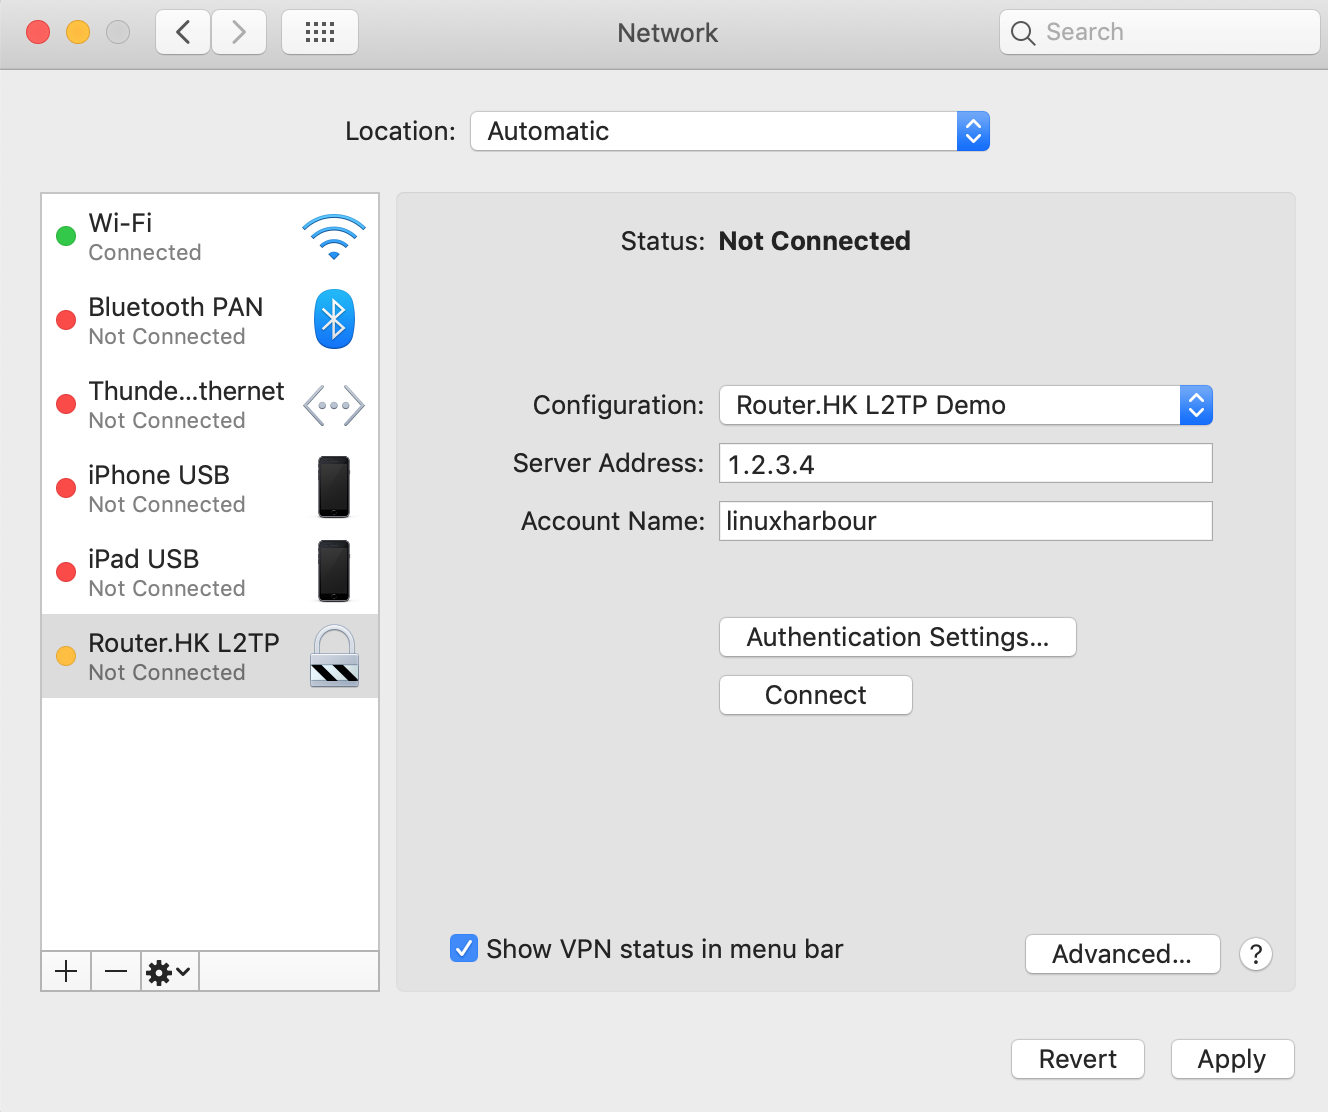
VPN 用戶電腦設定和連接
Click Wifi > Open Network Preferences… 出現 Network 設定。
Click + 加入 Interface: VPN (L2TP Over IPSec),Click Create。
Server Address: 輸入主機網址或名稱。
Account Name: 輸入 VPN 用戶名稱。
Click Authentication Settings…
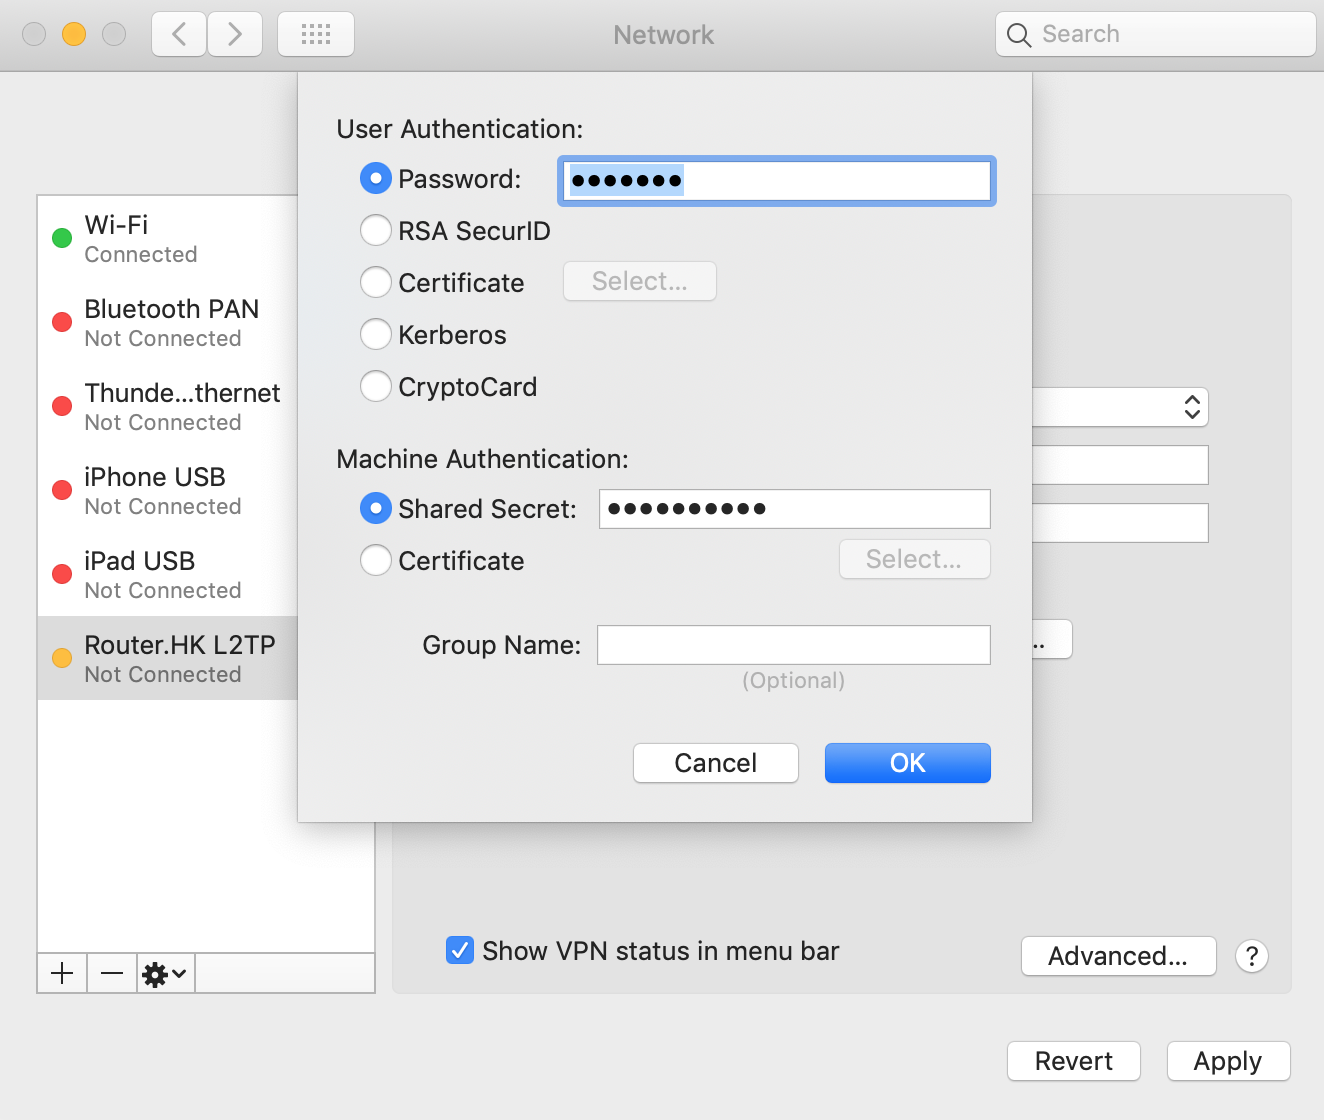
User Authentication: 的 Password: 輸入用戶密碼。
Machine Authentication: 的 Shared Secret: 輸入Pre-shared private key。
Click OK。

Click Advanced,在 Options 的 Session Options: click Send all traffic over VPN connection。
Click OK。
Click Apply。
Click Connect 就可以試試連接 VPN 了。
Click Show VPN status in menu bar 可以在 Menu Bar 看見狀態,也可用來 connect 或 disconnect VPN。
如果你喜歡本文,歡迎你透過 Patreon 定期支持開源人網誌工作。
Linux Harbour 提供商業 Linux 顧問服務。
